Setup|Express
Tables from Variable Data
In Setup|Express
Tables from Variable Data, you can create tables from variables
in your variable type data file or edit existing tables in your job file.
Upon initial entry into the Express Tables
from Variable Data dialog box, WinCross displays the number of
variables and number of cases in the open data file and the number of
tables in the open job file.
Find a variable
- Allows you to enter search criteria
to locate a specific variable. This is especially useful when there
are many variables in your data file and you only want to select a
specific variable or group of variables.
Find
Next
- Finds the next occurrence of the
search value specified in Find a
variable. The Find Next
button turns gray when no more occurrences of the search value are
found.
Find a table
- Allows you to enter search criteria
to locate a specific table. This is especially useful when there are
many tables in your job file and you only want to select a specific
table or group of tables.
Find
Next
- Finds the next occurrence of the
search value specified in Find a
table. The Find Next
button turns gray when no more occurrences of the search value are
found.
Scan
data when creating tables
- Scan
data when creating tables is the Express
Tables from Variable Data default and provides a comprehensive
search for all data values including data not represented by a Value Label. For large data files,
the Scan data when creating tables
option, may slow the process of creating tables. If you do not need
to see data values that are not represented by Value
Labels (outliers), you can deselect this option
to reduce processing time. See Creating
tables with the "Scan data when creating tables" option
selected or Creating tables
with the "Scan data when creating tables" option
NOT selected below for more detailed
information about this option.
- You can limit the number of cases
scanned when creating tables by entering the number of cases in the
Scan cases field.
Note: If you limit the number of cases
scanned when creating tables, if the Compute
and display the frequency report automatically option
is selected and Scan all
cases is enabled, all
cases may still be scanned. It is best to deselect the
Compute and display the frequency
report automatically option
if you want to limit the number of cases being scanned. |
Use
glossary transformations
- Populates the list of variables and
creates tables with Glossary
statements applied. These Glossary
statements might include DELETE,
DEFINE,
DECLARE, LABEL, CODEVALUE, etc. and would affect which
variables display in the list and/or how the tables are created.
- The WinCross default is to Use glossary transformations.
Selecting variables
- When a variable is selected from
the list of variables, the variable Name,
Type and Label
are displayed. If multiple variables are selected, the information
about the last variable selected will be displayed.
- Compute
and display the frequency report automatically - When
selected, this option displays the Frequency
of each Code
and Value Label
for the selected variable. If multiple variables are selected,
the information about the last variable selected will be displayed.
- Scan
all cases - Scans all cases in the data file when computing
the frequency report.
- Scan
n
cases
- Scans the number of cases specified when computing the frequency
report.
Note:
Table options for tables created
using the Create n
Table(s), Create One Table
with n Rows or
Create One Table Using Net Logic
options are assigned from the
Preferences section
of your job file. Table options for tables created using the
Summary of Means or Summary
of Frequencies options,
use a default set of the most commonly used table options for
these types of tables. |
Creating tables with
the "Scan data when creating tables" option selected
- Create
n
Table(s)
- Select a variable or group of variables to create tables. This option
creates one table for each variable selected. Variables can be non-contiguous
by selecting the Ctrl key
when selecting variables from the list. The table(s) is created using
Value Lables when present
or data values when Value Labels
are not present.
- Create
One Table with n Rows
- Select a variable or group of variables to create one table. This
option creates one table. Each Value
Label and Code Value
from all variables selected becomes a row on the table. Data not represented
by a Value Label also becomes
a row on the table using the data value as the row text. Variables
can be non-contiguous by selecting the Ctrl
key when selecting variables from the list.
- Create
One Table Using Net Logic - Select a variable or group of variables
to create one table. This option creates one table. The row logic
for the table is created using the Scan (S)
feature when variables are contiguous and using the OR logical operator when variables are not
contiguous. The row text for the table is created using the Value Labels of the first variable
selected. Data not represented by a Value
Label also becomes a row on the table using the data value
as the row text. Variables can be non-contiguous by selecting the
Ctrl key when selecting variables
from the list.
Note:
If the variables selected have different Code
Values, you will receive a message "The
variables that were selected for netting are not identical to
one another in their structure. Do you still want to create a
net table?". This message is informational only and
does not prevent you from creating the net table. |
- Summary
of Means - Select a variable or group of variables to create
one summary table.
- This option creates one summary
of means table with one row per variable selected.
- The row text for the table is created
using the Variable Label for
each variable selected.
- The row logic for the table is created
using the Code Values or range
of Code Values specified (i.e.
2,4,6 or 1-10) or the Code Values
selected from the code value and value label list for the variables
selected.
- The rows are created with the Mean row option specified.
- Variables can be non-contiguous
by selecting the Ctrl key
when selecting variables from the list.
- Reverse
scale will automatically add the necessary logic for reversing
the Code Values (for example,
^Q2_1 (1-4) #1=4,2=3,3=2,4=1^SM). In the example given, for purposes
of computing the mean, the code value 1 becomes a 4, the code value
2 becomes a 3, the code value 3 becomes a 2 and the code value 4 becomes
a 1.
- Enabling the Use
variable label from first selected variable as table title
option allows you to use the Variable
Label from the first variable selected as the table title for
the new table. If this option is not
selected, WinCross uses a default table title.
- Summary
of Frequencies - Select a variable or group of variables to
create one summary table.
- This option creates one summary
of frequencies table with one row per variable selected.
- The row text for the table is created
using the Variable Label for
each variable selected.
- The row logic for the table is created
using the Code Values or range
of Code Values specified (i.e.
2,4,6 or 1-10) or the Code Values
selected from the code value and value label list for the variables
selected.
- You can also specify the Code
Values or range of Code Values
to be used for the percentaging base (this is optional and not required).
When you specify Code Values
or a range of Code Values
for the percentaging base, the rows of the table are created twice.
Q.2 Agreement with the following
statement: I consider myself an outdoors person^ |
Q2_1 (1-4)^HR |
Q.2 Agreement with the following
statement: I wish the parks were open for longer hours^ |
Q2_2 (1-4)^HR |
Q.2 Agreement with the following
statement: I wish all of the local parks in Arizona had after
school programs for kids^ |
Q2_3 (1-4)^HR |
Q.2 Agreement with the following
statement: I trust that the Arizona Parks and Recreation staff
are well-trained^ |
Q2_4 (1-4)^HR |
Q.2 Agreement with the following
statement: I consider myself an outdoors person^ |
Q2_1 (1,2)^1 |
Q.2 Agreement with the following
statement: I wish the parks were open for longer hours^ |
Q2_2 (1,2)^2 |
Q.2 Agreement with the following
statement: I wish all of the local parks in Arizona had after
school programs for kids^ |
Q2_3 (1,2)^3 |
Q.2 Agreement with the following
statement: I trust that the Arizona Parks and Recreation staff
are well-trained^ |
Q2_4 (1,2)^4 |
The first set of rows is created with the Hide row option specified. The second
set of rows is created with the percentaging row specified. The percentaging
row is a numeric value that represents the sequence number of the row
being used for percentaging. For example, the row logic ^Q2_1 (1,2)^1
is using row 1 of this table as the percentaging base for this row. Variables
can be non-contiguous by selecting the Ctrl
key when selecting variables from the list. This option is especially
useful for top and bottom box summary tables.
- Enabling the Use
variable label from first selected variable as table title
option allows you to use the Variable
Label from the first variable selected as the table title for
the new table. If this option is not
selected, WinCross uses a default table title.
- When only one Code
Value is specified for Enter
the code value or range for the rows, you can also choose to
Use value labels as row text
in place of the variable labels.
- Select the Show
filter row option to display the filter row. The default for
Summary of Frequencies tables
is to suppress the filter row.
- Create
1 Table with a Single Frequency Row/Create n Tables with
One Freq. Row Each - Select a variable or group of variables
to create tables with a single frequency row.
- A frequency row lets you quickly
create row(s) for a table from a variable with many values. For example,
you might want a table of zip codes, where each zip code is a row.
A frequency row will generate a row for each value using the actual
values in the data as row text.
- This option creates one table for
each variable selected.
- Variables can be non-contiguous
by selecting the Ctrl key
when selecting variables from the list.
- The table(s) is created using a
default formatting mask and Sort
order of Ascending.

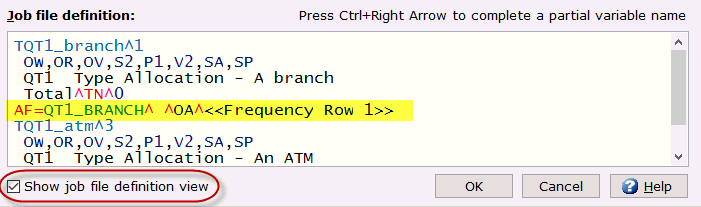
Note: Enable the Show
job file definition view
check box to display the Job
file definition window. |
Creating tables with the "Scan
data when creating tables" option NOT
selected
- Create
n
Table(s)
- Select a variable or group of variables to create tables. This option
creates one table for each variable selected. Variables can be non-contiguous
by selecting the Ctrl key
when selecting variables from the list. The table(s) is created using
Value Lables when present
and does NOT include data
values when Value Labels are
not present. Data not represented by Value
Labels is added as a Frequency
Row (i.e. AF=Q2_2^ ^OA^).
- Create
One Table with n Rows
- Select a variable or group of variables to create one table. This
option creates one table. Each Value
Label and Code Value
from all variables selected becomes a row on the table. Data not represented
by Value Labels is added as
a Frequency
Row (i.e. AF=Q2_2^ ^OA^). Variables can be non-contiguous
by selecting the Ctrl key
when selecting variables from the list.
- Create
One Table Using Net Logic - Select a variable or group of variables
to create one table. This option creates one table. The row logic
for the table is created using the Scan (S)
feature when variables are contiguous and using the OR logical operator when variables are not
contiguous. If at least one of the variables selected has Value
Labels, the row text for the table is created using those Value Labels. If none of the variables
selected have Value Labels,
a blank table is created. Variables can be non-contiguous by selecting
the Ctrl key when selecting
variables from the list.
Note:
When the variables selected have different Code
Values, you will receive a message "The
variables that were selected for netting are not identical to
one another in their structure. Do you still want to create a
net table?". This message is informational only and
does not prevent you from creating the net table. |
- Summary
of Means - Select a variable or group of variables to create
one summary table.
- This option creates one summary
of means table with one row per variable selected.
- The row text for the table is created
using the Variable Label for
each variable selected.
- If none of the variables selected
have Value Labels, a blank
table is created.
- The row logic for the table is created
using the Code Values or range
of Code Values specified (i.e.
2,4,6 or 1-10) or the Code Values
selected from the code value and value label list for the variables
selected.
- The rows are created with the Mean row option specified.
- If none of the variables selected
have Value Labels, a blank
table is created.
- Variables can be non-contiguous
by selecting the Ctrl key
when selecting variables from the list.
- Reverse scale will automatically
add the necessary logic for reversing the Code
Values (for example, ^Q2_1 (1-4) #1=4,2=3,3=2,4=1^SM).
In the example given, for purposes of computing the mean, the code
value 1 becomes a 4, the code value 2 becomes a 3, the code value
3 becomes a 2 and the code value 4 becomes a 1.
- Enabling the Use
variable label from first selected variable as table title
option allows you to use the Variable
Label from the first variable selected as the table title for
the new table. If this option is not
selected, WinCross uses a default table title.
- Summary
of Frequencies - Select a variable or group of variables to
create one summary table.
- This option creates one summary
of frequencies table with one row per variable selected.
- The row text for the table is created
using the Variable Label for
each variable selected.
- The row logic for the table is created
using the Code Values or range
of Code Values specified (i.e.
2,4,6 or 1-10) or the Code Values
selected from the code value and value label list for the variables
selected.
- You can also specify the Code
Values or range of Code Values
to be used for the percentaging base (this is optional and not required).
When you specify Code Values
or a range of Code Values
for the percentaging base, the rows of the table are created twice.
Q.2 Agreement with the following
statement: I consider myself an outdoors person^ |
Q2_1 (1-4)^HR |
Q.2 Agreement with the following
statement: I wish the parks were open for longer hours^ |
Q2_2 (1-4)^HR |
Q.2 Agreement with the following
statement: I wish all of the local parks in Arizona had after
school programs for kids^ |
Q2_3 (1-4)^HR |
Q.2 Agreement with the following
statement: I trust that the Arizona Parks and Recreation staff
are well-trained^ |
Q2_4 (1-4)^HR |
Q.2 Agreement with the following
statement: I consider myself an outdoors person^ |
Q2_1 (1,2)^1 |
Q.2 Agreement with the following
statement: I wish the parks were open for longer hours^ |
Q2_2 (1,2)^2 |
Q.2 Agreement with the following
statement: I wish all of the local parks in Arizona had after
school programs for kids^ |
Q2_3 (1,2)^3 |
Q.2 Agreement with the following
statement: I trust that the Arizona Parks and Recreation staff
are well-trained^ |
Q2_4 (1,2)^4 |
The first set of rows is created
with the Hide row option specified.
The second set of rows is created with the percentaging row specified.
The percentaging row is a numeric value that represents the sequence number
of the row being used for percentaging. For example, the row logic ^Q2_1
(1,2)^1 is using row 1 of this table as the percentaging base for this
row. Variables can be non-contiguous by selecting the Ctrl
key when selecting variables from the list. This option is especially
useful for top and bottom box summary tables.
- If none of the variables selected
have Value Labels, a blank
table is created.
- Enabling the Use
variable label from first selected variable as table title
option allows you to use the Variable
Label from the first variable selected as the table title for
the new table. If this option is not
selected, WinCross uses a default table title.
- When only one Code
Value is specified for Enter
the code value or range for the rows, you can also choose to
Use value labels as row text
in place of the variable labels.
- Select the Show
filter row option to display the filter row. The default for
Summary of Frequencies tables
is to suppress the filter row.
- Create
1 Table with a Single Frequency Row/Create n Tables with
One Freq. Row Each - Select a variable or group of variables
to create tables with a single frequency row.
- A frequency row lets you quickly
create row(s) for a table from a variable or record/column location
with many values. For example, you might want a table of zip codes,
where each zip code is a row. A frequency row will generate a row
for each value using the actual values in the data as row text.
- This option creates one table for
each variable selected.
- Variables can be non-contiguous
by selecting the Ctrl key
when selecting variables from the list.
- The table(s) is created using a
default formatting mask and Sort
order of Ascending.
Note: Enable the Show
job file definition view
check box to display the Job
file definition window. |
Tables
- When a table is created from a variable
or group of variables, the variable Name
becomes the table Name and
the variable Label becomes
the table Title. When multiple
tables are selected and either Create
One Table with n
Rows or Create
One Table Using Net Logic is selected, the variable Name
and Label of the last variable
selected become the table Name
and table Title for the new
table.
- The table list displays the Name, Title
and Index number for each
table in the list.
- When a table(s) in the list is selected,
the job file definition for the table(s) selected display in the Job file definition list box.
- Tables can be moved Up or moved Down
in the list either separately or in a group including non-contiguous
tables.
- Tables can be renumbered by selecting
a single table and choosing Renumber,
however, the starting table Name
must be numeric. Renumbering will begin at the selected table and
continue to the end of the table list. The starting value will be
the table Name of the selected
table.
- To renumber the starting table Name edit the table number in the
Job file definition list box
and select Accept
Changes. Choose Discard
Changes to cancel modifications made in the Job
file definition list box.
- Table Index
numbers are displayed in the tables list to the right of the Title. Use the scroll bar at the
bottom of the table list if necessary to see the Index
column.
- To assign new index numbers to all
tables, select Reindex.
Enter the starting value if different than 1.
The starting value is always incremented by 1.
USE
statements will be adjusted automatically to reflect the new table
index values.
- You can duplicate a single table
by highlighting the table and selecting Duplicate.
The table is duplicated below the selected table and is assigned a
unique Index number.
- You can add table options, table
statistics, add filter logic, edit row text, add rows, delete rows,
add NET
and SUB
rows and more by highlighting a single table and selecting Edit. Alternatively,
you can double-click a single table to launch the Express Table Editor
dialog box.
- Choose Select
All to select all of the tables in the table list. Reindex,
Format and Delete
are the only actions allowed when all tables have been selected using
Select All.
- Format
lets you align table logic as close as possible to the row text for
each table. The logic is aligned to the longest row text in the table.
You can format your entire job file by choosing Select
All and then Format.
Formatting tables creates a job file that is easier to edit and helps
to locate errors identified in the report log when running tables.
- Filter
allows you to specify a Filter title,
Filter logic and Filter
type for the selected table(s).
- Choose Delete
to remove a table or group of tables. When selecting tables for deletion,
tables can be non-contiguous by selecting the Ctrl
key.
- Enabling the Show
job file definition view check box will display the Job
file definition portion of the Express
Tables from Variable Data dialog.
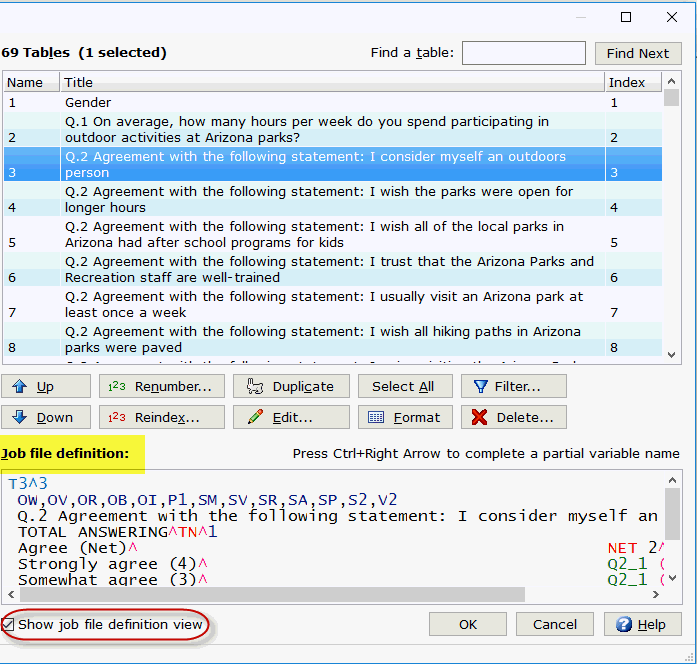
- For new tables created from variables
in the variables list, the Job file
definition list box displays the table(s) as it will appear
in the job file (View|Job
File).
- For existing tables, the Job
file definition list box displays the table(s) selected as
they currently appear in the job file (View|Job File).
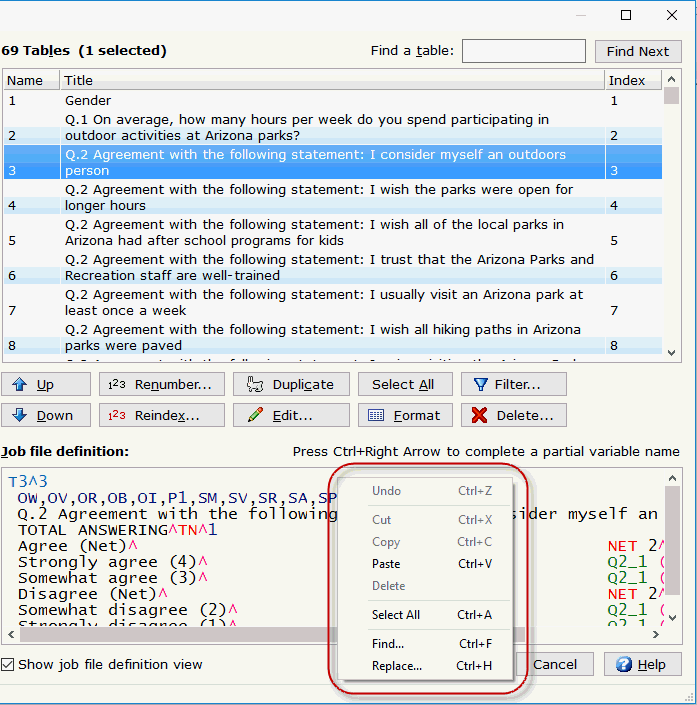
- The Job
file definition list box provides a right-click context menu
with options to Undo, Cut, Copy,
Paste, Delete,
Select All, Find,
and Replace.
- When a change is detected in the
Job file definition list box,
the Accept
Changes and Discard
Changes options become enabled allowing you to accept or discard
changes made here. Changes made and accepted here are not reflected
in the current open job file, until you exit the Express
Table from SPSS Data dialog box by selecting OK.
You will still need to save your job (File|Save|Save Job) to permanently
save your changes.
- Selecting Cancel
on the Express Tables from Variable
Data dialog box will only cancel changes made using this dialog
if the Apply Changes and Run Tables
option was NOT selected.
Once the Apply Changes and Run Tables
option is selected, Cancel
will only cancel changes made after the Apply
Changes and Run Tables option was selected.
- Save
Changes allows you to save changes made in Express
Tables from Variable Data without exiting this dialog.
Note: Changes saved using the Save Changes option
are permanently saved to your job file, so use this option with
care. |
- Apply
Changes and Run Tables allows you to apply changes and run
tables to quickly view the results of your current changes. The Run Tables dialog box displays and
allows you to use all of the Run
Tables options with the exception of writing tables using the
Report viewing format of Enhanced text report. You cannot
print tables produced using the Apply
Changes and Run Tables option.
- The Apply
Changes and Run Tables option saves all changes made using
the Express Table from Variable Data
dialog box to the currently open job file. You will still need to
save your job (File|Save|Save
Job) to permanently save your changes.
Related topics:
Setup Menu
Setup Tables
Add Frequency Row